Skip to content

Category: GCP

Send Resource Changes Notification in GCP to Microsoft Teams

Currently I am helping an organization to adopt Google Cloud Platform. And though we have decided to use terraform for infrastructure as code, some people are creating/modifying resources directly through console. And so what we wanted to in some auditability and notification around resource creation or modification.

With GCP all the audit logs are available in google cloud logging. However, cloud logging is costly and not a good idea to store log for a longer period of time. The other reason is query format for logging is bit different and not everyone is familiar with that.

Audit

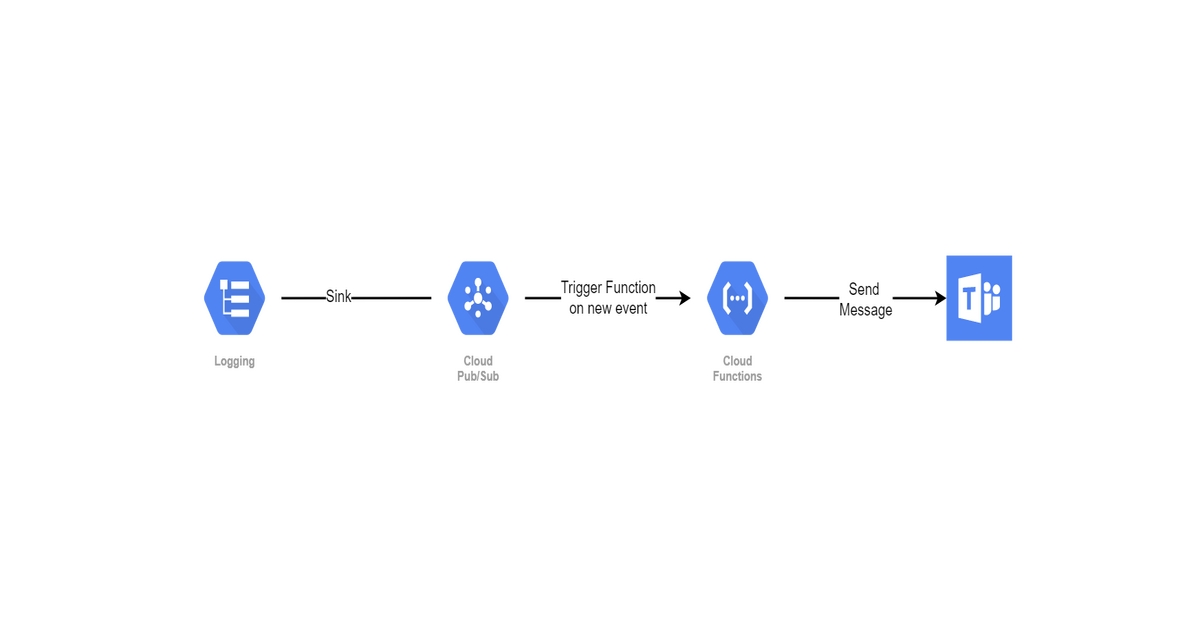
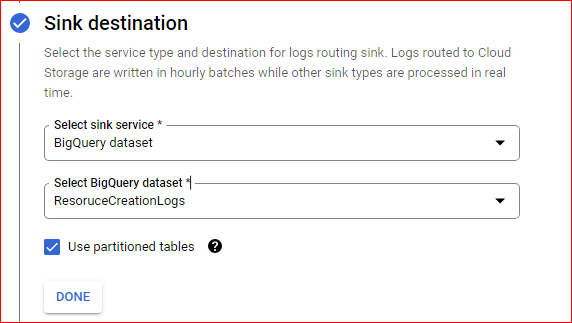
For Audit Purpose I am configuring the GCP Log Router to redirect the logs to bigquery.

Query

Query is only looking for any modification done by any user rather than service account.

protoPayload.@type="type.googleapis.com/google.cloud.audit.AuditLog"
protoPayload.authenticationInfo.principalSubject:"user:"
proto_payload.method_name: ("delete" OR "create" OR "update")

Make sure to choose Use partitioned tables else it will create a table for day.

Once you configure the sink, you will be able to see all the logs for any resource modification.

Notification

GCP does not have any direct integration available with Microsoft teams ( may be coz it’s Microsoft product :)). And so I needed to write my own cloud function which can send message to teams’ channel.

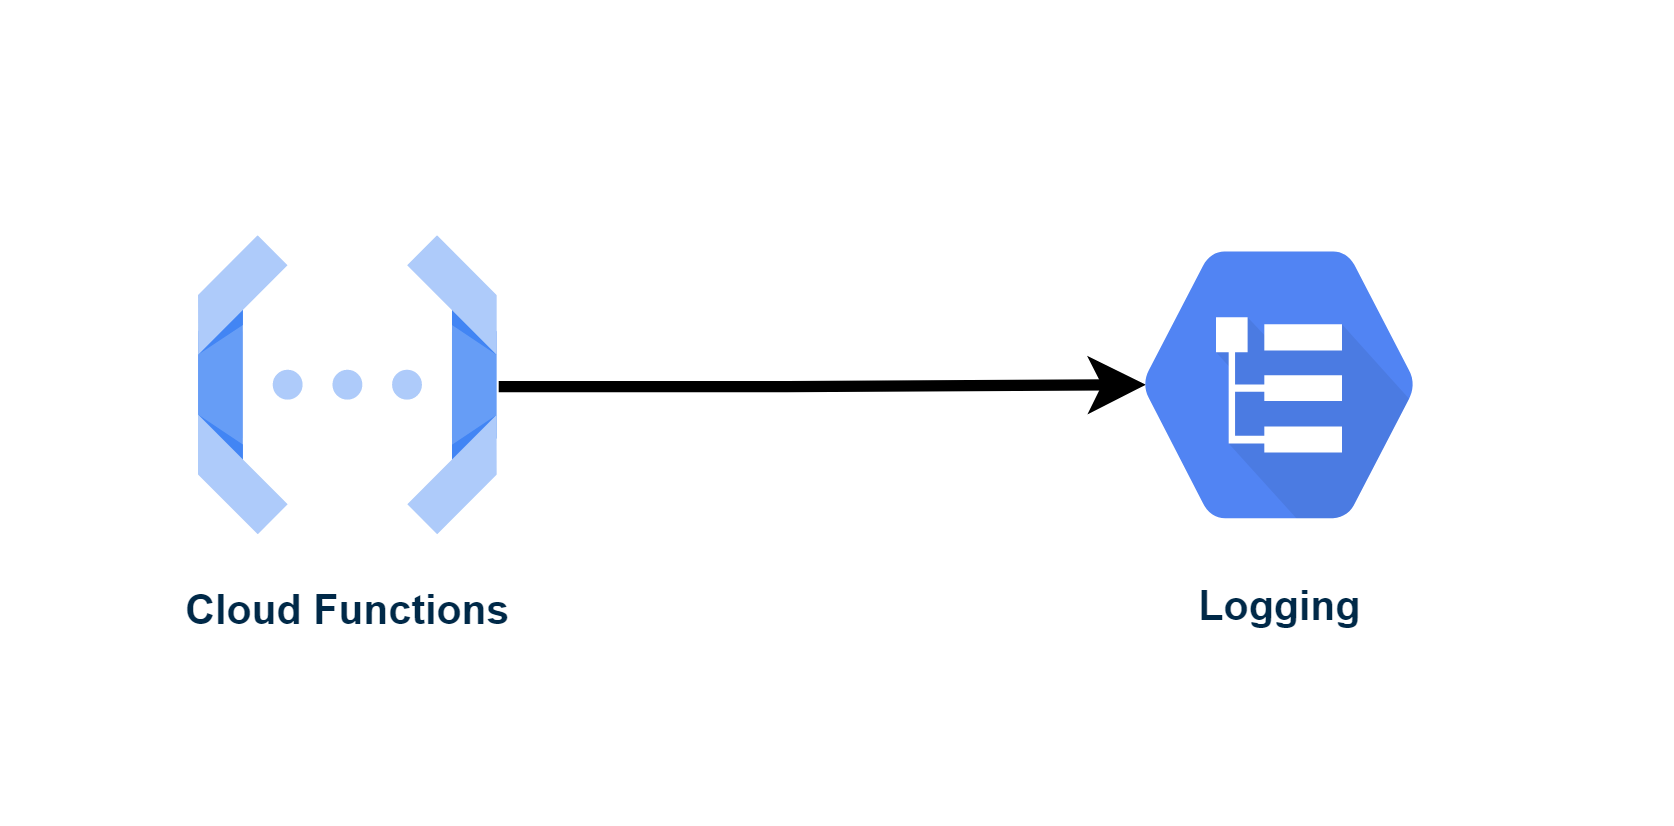
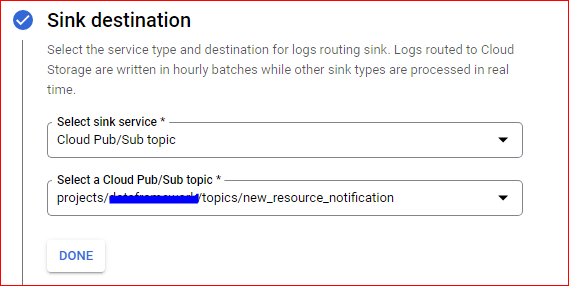
For this as well we need to create sink with similar query. However, rather than sending logs to bigquery we are sending logs to PubSub topic.

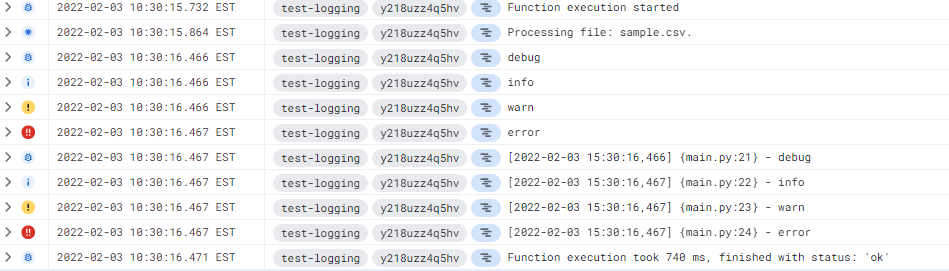
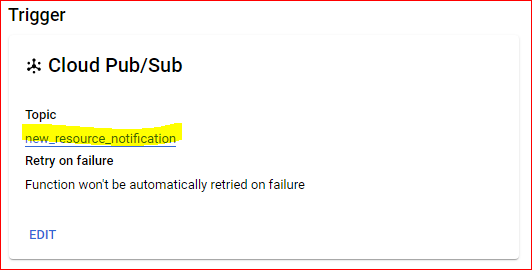
Once Sink is created we need to create a cloud function to trigger when event appears on this topic.

Code

import base64
import json
import os
import requests
from pprint import pprint


def func_handler(event, context):
    """Triggered from a message on a Cloud Pub/Sub topic.
    Args:
         event (dict): Event payload.
         context (google.cloud.functions.Context): Metadata for the event.
    """
    message = json.loads(base64.b64decode(event['data']).decode('utf-8'))
    pprint(message)
    print(type(message))
    resource_type = message.get("resource").get("type")
    project_id = message.get("resource").get("labels").get("project_id")
    region = message.get("resource").get("labels").get("region")
    method = message.get("protoPayload").get("methodName").lower()
    user = message.get("protoPayload").get("authenticationInfo").get("principalEmail")
    resource_name = message.get("protoPayload").get("resourceName").split("/")[-1]

    if "create" in method:
        action = "created"
    elif "update" in method:
        action = "updated"
    elif "delete" in method:
        action = "deleted"
    else:
        action= method

    title = "{} got {}".format(resource_type, action)
    content="""
    Resource Name: {} 
    Project ID: {} 
    Region: {} 
    Action: {}
    User: {}
    """.format(resource_name, project_id, region, action, user)
    webhook = os.environ.get("webhook")
    send_teams(webhook, content, title)


def send_teams(webhook_url:str, content:str, title:str, color:str="FF0000") -> int:
    """
      - Send a teams notification to the desired webhook_url
      - Returns the status code of the HTTP request
        - webhook_url : the url you got from the teams webhook configuration
        - content : your formatted notification content
        - title : the message that'll be displayed as title, and on phone notifications
        - color (optional) : hexadecimal code of the notification's top line color, default corresponds to black
    """
    response = requests.post(
        url=webhook_url,
        headers={"Content-Type": "application/json"},
        json={
            "themeColor": color,
            "summary": title,
            "sections": [{
                "activityTitle": title,
                "activitySubtitle": content
            }],
        },
    )
    print(response.status_code) # Should be 200
Leave a Comment

GCP – Bring CDC data using Debezium

Few months back our organization decided to go with GCP for data platform. And so we started evaluating multiple tools to bring data from different RDMBS sources. Our goal was to find a tool which helps us identify CDC from multiple sources we have (MySQL, oracle, sql server, db2 on mainframe) and bring it to either cloud storage or bigquery.

And by the time I am writing this blog, GCP doesn’t have any tool which satisfies our requirement. It has data stream but it only supports oracle and MySQL. And while searching outside GCP I stumbled upon Debezium. Debezium is a open source tool which help identify CDC from multiple RDBMS sources and puts the data on Kafka or pubsub topics in real-time. Much better, we were looking for some batch solution and we found streaming.

In this blogpost, I will explain in details how to deploy Debezium on GCP Kubernatees cluster and connect that to gcp cloudsql and gcp pubsub topics.

Deploying Debezium on GCP Kubernatees

Create Service Accounts

To deploy debezium on kubernatees we first need to create an I Am service account. create a service account with following roles.

  • Cloud SQL Client
  • Pub/Sub Publisher

You will also need to create a service account for pods. use the following command line from to create service account.

kubectl apply -f - <<EOF
apiVersion: v1
kind: ServiceAccount
metadata:
name: debezium-sa
EOF

Create MySQL User

considering you already have a cloud sql (mysql) instance running. let’s create a user with proper access to read transaction logs.

CREATE USER 'replication_user'@'%' IDENTIFIED BY 'secret';
GRANT SELECT, RELOAD, SHOW DATABASES, REPLICATION SLAVE, REPLICATION CLIENT ON *.* TO 'replication_user'

Create GCP Kubernetes cluster for Debezium

gcloud beta container clusters create "debezium-poc" --scopes=sql-admin,pubsub --region "us-east1" --service-account=sa-debzium-k8@dataframework.iam.gserviceaccount.com

now, once cluster is created we need to deploy pods and configuration for the pods.

Deploying config-map

mysql_config_map.yaml

apiVersion: v1
kind: ConfigMap
metadata:
  name: debezium-mysql
  labels:
    app: debezium-mysql
data:
  application.properties: |-
      debezium.sink.type=pubsub
      debezium.source.connector.class=io.debezium.connector.mysql.MySqlConnector
      debezium.source.offset.storage.file.filename=data/offsets.dat
      debezium.source.offset.flush.interval.ms=0
      debezium.source.database.hostname=localhost
      debezium.source.database.port=3306
      debezium.source.database.user=replication_user
      debezium.source.database.password=secret
      debezium.source.database.server.id=184054
      debezium.source.database.server.name=dpmysql
      debezium.source.database.history = io.debezium.relational.history.FileDatabaseHistory
      debezium.source.database.history.file.filename = history_file.txt

in above configuration. Please change user and password as per the user you have created. server.name could be anything which makes sense for you for the source. server.id needs to be a unique number so you can provide any random number.

To deploy the config map run the following command.

kubectl apply -f mysql_config_map.yaml

Deploying StatefulSet

StatefulSet is consist of two containers.

  • debezium server – While writing this blog 1.7.0.Final is the latest version available so I am using it. however, you can use whatever version is latest.
  • cloud-sql-proxy – This is required to connect cloud sql instance from kubernetes.

mysql_statefulset.yaml

apiVersion: apps/v1
kind: StatefulSet
metadata:
  name: debezium-mysql
  labels:
    app: debezium-mysql
spec:
  replicas: 1
  serviceName: debezium-mysql
  selector:
    matchLabels:
      app: debezium-mysql
  template:
    metadata:
      labels:
        app: debezium-mysql
        version: v1
    spec:
      serviceAccountName: debezium-sa
      securityContext:
        fsGroup: 185 # Debezium container uses jboss user thats id is 185.
      containers:
        - name: debezium-server
          image: debezium/server:1.7.0.Final
          volumeMounts:
            - name: debezium-config-volume
              mountPath: /debezium/conf
            - name: debezium-data-volume
              mountPath: /debezium/data
        - name: cloud-sql-proxy
          image: gcr.io/cloudsql-docker/gce-proxy:1.27.1
          command: 
            - /cloud_sql_proxy
            - -instances=dataframework:us-east1:dpmysql-public=tcp:3306
          securityContext:
            runAsNonRoot: true
      volumes:
        - name: debezium-config-volume
          configMap:
            name: debezium-mysql
  volumeClaimTemplates:
    - metadata:
        name: debezium-data-volume
      spec:
        accessModes: [ "ReadWriteOnce" ]
        resources:
          requests:
            storage: 10Mi

To deploy the Statefulset run following command

 kubectl apply -f mysql_statefulset.yaml

Deploying Service

the last thing we need to deploy is a service for our pods.

mysql_cdc_service.yaml

apiVersion: v1
kind: Service
metadata:
  name: debezium-mysql
  labels:
    app: debezium-mysql
spec:
  type: ClusterIP
  ports:
    - port: 8080
      targetPort: 8080
      protocol: TCP
      name: http
  clusterIP: None
  selector:
    app: debezium-mysql

To deploy service run the following command

 kubectl apply -f mysql_cdc_service.yaml

Create PubSub Topic

so now, we have deployed the Debezium on Kubernetes, all we need is a pubsub topic created to capture all the changes.

The topic name should be in format: <server_name>. <database_name>.<table_name>

  • server_name – this should be from your config map debezium.source.database.server.name property
  • database_name – mysql database name
  • table_name – mysql table name.

1 Comment

GCP Cloud Functions Logging With Python

Cloud Function does a good job of redirecting all your print statements to logging. This is really good for basic work. However, for production ready code we need proper logging level with our application log. There are two way to achieve this. one way is to use cloud logging module provided by google and other is to write a custom formatter for python logging. I am going to share both the ways here.

Using Cloud Logging Module

For this you need to have google-cloud-logging python library in your requirement.txt

from google.cloud import logging as cloudlogging

def hello_gcs(event, context):
    logger = get_logger(__name__)
    logger.info("info")
    logger.warn("warn")
    logger.error("error")
    logger.debug("debug")
	
	
def get_logger(name):
  lg_client = cloudlogging.Client()
  
  lg_handler = lg_client.get_default_handler()
  cloud_logger = logging.getLogger("cloudLogger")
  cloud_logger.setLevel(logging.DEBUG)
  cloud_logger.addHandler(lg_handler)
  return cloud_logger

This is how it would look like, if you’ll use above code for cloud logging.

Using Custom Formatter

def hello_gcs(event, context):
    logger = get_custom_logger(__name__)
    logger.debug("debug")
    logger.info("info")
    logger.warn("warn")
    logger.error("error")
    

class CloudLoggingFormatter(logging.Formatter):

    """Produces messages compatible with google cloud logging"""
    def format(self, record: logging.LogRecord) -> str:
        s = super().format(record)
        return json.dumps(
            {
                "message": s,
                "severity": record.levelname
            }
        )

def get_custom_logger(name):
  cloud_logger = logging.getLogger(name)
  handler = logging.StreamHandler(sys.stdout)
  formatter = CloudLoggingFormatter(fmt="[%(asctime)s] {%(filename)s:%(lineno)d} - %(message)s")
  handler.setFormatter(formatter)
  cloud_logger.addHandler(handler)
  cloud_logger.setLevel(logging.DEBUG)
  return cloud_logger

And this is how it looks with custom formatter.

And this is the comparison for both,

Leave a Comment

Google Cloud Scheduler to Auto Shutdown Cloud SQL

Recently I started working on GCP, and for one of my POC I wanted cloud SQL. As this was POC I did not want it to run 24×7 and was trying to find a way to auto shutdown at a particular time to save cost. I don’t think there is any in-built option for that. However, GCP cloud scheduler has an option to call http request at a scheduled interval. This is good, as cloud SQL allows to have some management operation done through rest calls.

New I AM Service Account

For Scheduler to successfully run shutdown operation, it needs to be associated with associated with a service account with proper roles. So let’s create a new service account.

  • Navigate to I am and then click on service account. You’re screen might look like this.
  • now let’s put some name and description. I normally put service at the start of the name, but it’s not necessary.
  • After this, we need to associate proper role to this account. For this we are going to choose Clod SQL Admin
  • For this purpose we don’t need to associate any user to this service account.

New Scheduler

  • Navigate to scheduler and click on create job . And fill the name, description, frequency and Timezone.
  • For this choose Target Type as HTTP. Your url should be as mentioned below.
    URL: https://sqladmin.googleapis.com/v1/projects/project-id/instances/instance-id
    Method: Patch
    Auth Header: Add OAuth Token
    Service Account: service-mange-cloud-sql (one we created in above step, if your name is different please choose that)
    Body:
{
  "settings": {
    "activationPolicy": "NEVER"
  }
}
  • In the next step you can configure retry, I am keeping it default for simplicity.
  • one successfully created you should be able to see your job on scheduler home page. Here you can test your job as well.
Leave a Comment