Skip to content

Tag: airflow

GCP Cloud Composer – Configure Hashicorp Vault to store connection and variables

Airflow providers multiple secrets backends to be configured for storing airflow connection and variables. for a long time we were using airflow backends however recently I migrated all the connection to vault and started using vault as our backend. In this post I will show you a step by step guide on how to do this.

Configure HashiCorp Vault

create mount point

we have multiple composer(airflow) environment and so strategy we have used is created a single mount point named airflow and then use the different path for different airflow instances. you could choose to have different strategy as per your organization standard and requirement. Run the following command to create the secrets mount point.

vault secrets enable -path=airflow -version=2 kv

Create role

vault provides multiple ways to authenticate, what we are going to use is role. so let’s create a role. please copy the secret id from the output and store it somewhere. this would be useful when we will vault connection in airflow.

vault write auth/approle/role/gcp_composer_role \
    role_id=gcp_composer_role \
    secret_id_ttl=0 \
    secret_id_num_uses=0 \
    token_num_uses=0 \
    token_ttl=24h \
    token_max_ttl=24h \
    token_policies=gcp_composer_policy

Create Policy

role need to be associated with a policy. policy is nothing but a grant (access). Run the following code to create a policy which would give read and list permission to airflow path, we created earlier.

vault policy write gcp_composer_policy - <<EOF
path "airflow/*" {
  capabilities = ["read", "list"]
}
EOF

now are are all set in vault. let’s change the airflow configuration to start using vault.

Configure Airflow (GCP Cloud Composer)

Navigate to your airflow instances and override following two settings.

  • secrets.backend = airflow.providers.hashicorp.secrets.vault.VaultBackend
  • secrets.backend_kwargs
{
"mount_point": "airflow", 
"connections_path": "dev-composer/connections" , 
"variables_path": null, 
"config_path": null, 
"url": "<your_vault_url>", 
"auth_type": "approle", 
"role_id":"gcp_composer_role", 
"secret_id":"<your_secret_id>"
}

connection_path: path where you would like to store your airflow connection. for me it’s my composer name and then connection. if you have single airflow you could just store everything under connection.
variables_path: i have specified null as I am storing variables in airflow. if you want to store variables also in vault, just provide the path.
config_path: same as variables, I am keeping config in airflow
url: replace with you vault url
auth_type: we are using approle to authenticate with vault as discussed above
role_id: the role we created above. if you have used different name, please replace here.
secret_id: secret_id we generated for the role

How to store connections

for connection create a path with connection name and put the json with proper key and value for connection. for example, default bigquery connection. it would look like this.

mount point: airflow
Path: dev-composer/connections/bigquery_default

{
  "conn_type": "google_cloud_platform",
  "description": "",
  "extra": "{\"extra__google_cloud_platform__project\": \"youre_project\", \"extra__google_cloud_platform__key_path\": \"\", \"extra__google_cloud_platform__key_secret_name\": \"\", \"extra__google_cloud_platform__keyfile_dict\": \"\", \"extra__google_cloud_platform__num_retries\": 5, \"extra__google_cloud_platform__scope\": \"\"}",
  "host": "",
  "login": "",
  "password": null,
  "port": null,
  "schema": ""
}

How to store variables

for variables. in the json key would alway be value. as shows below

mount point: airflow
path: dev-composer/variables/raw_project_name

{
  "value": "raw_project_id"
}
Leave a Comment

GCP Cloud Composer – Things to consider before implementation

When planning to use Google Cloud Composer (Airflow in GCP), there are few essential considerations to address before setup. While these can be configured post-setup, it would be a tedious and time-consuming task.

TimeZone for scheduler

he default time for the scheduler is UTC. This means if you schedule a DAG to run at 5 PM, it will run at 5 PM UTC, not your local time. Calculating this for each DAG deployment is impractical. It’s advisable to change the default scheduling time.
To change this:

  • Navigate to your airflow instance
  • Go to airflow configuration overrides.
  • click on edit and choose the time zone you want for core.default_timezone

Where to store airflow connection and variables

By default, Airflow (Google Cloud Composer) stores connections and variables within Airflow itself. However, it supports multiple external backends, including GCP, AWS, and HashiCorp Vault. Airflow does not version these connections or variables nor provides granular access control, making it prudent to store them externally. Organizational standards often require storing all secrets and certificates in a single system.

In our setup, we chose to store connections in HashiCorp Vault due to their sensitive nature, while non-sensitive variables remained in Airflow.

One key point to note: Airflow adds new backends as extra backends. If it cannot find a variable or connection in the external backend (e.g., Vault), it will search within Airflow itself.

Default Role assignment for All Airflow Users

Airflow has built-in RBAC with five main roles: public, viewer, user, op, admin. The default role assigned to all users in GCP is ‘op’.

If this role doesn’t fit your organizational needs, create a custom role and change the default role assignment.

In our scenario, the ‘op’ role includes permissions to create and maintain connections and variables. Since we maintain all connections in HashiCorp Vault, we didn’t want duplicates created within Airflow. Therefore, we created a custom role without these permissions and set it as the default role for all users. To change the default role, override webserver.rbac_user_registration_role to the custom role.

By addressing these configurations early on, you can streamline your use of Google Cloud Composer and Airflow in GCP, ensuring efficient and secure operations.

Leave a Comment

Airflow Operational Dashboard using Bigquery and Looker Studio

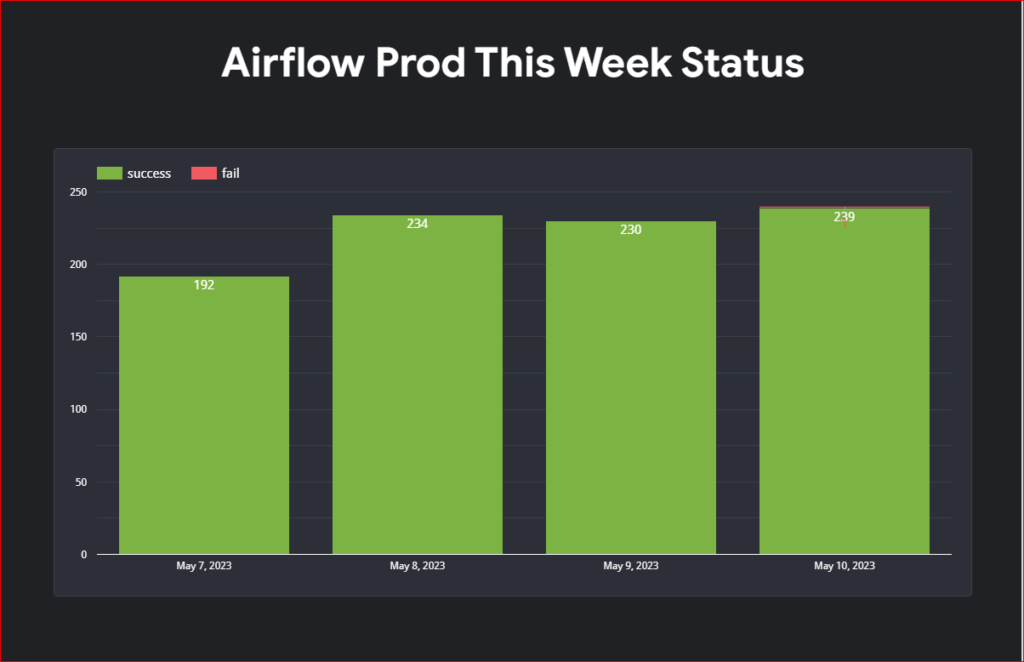
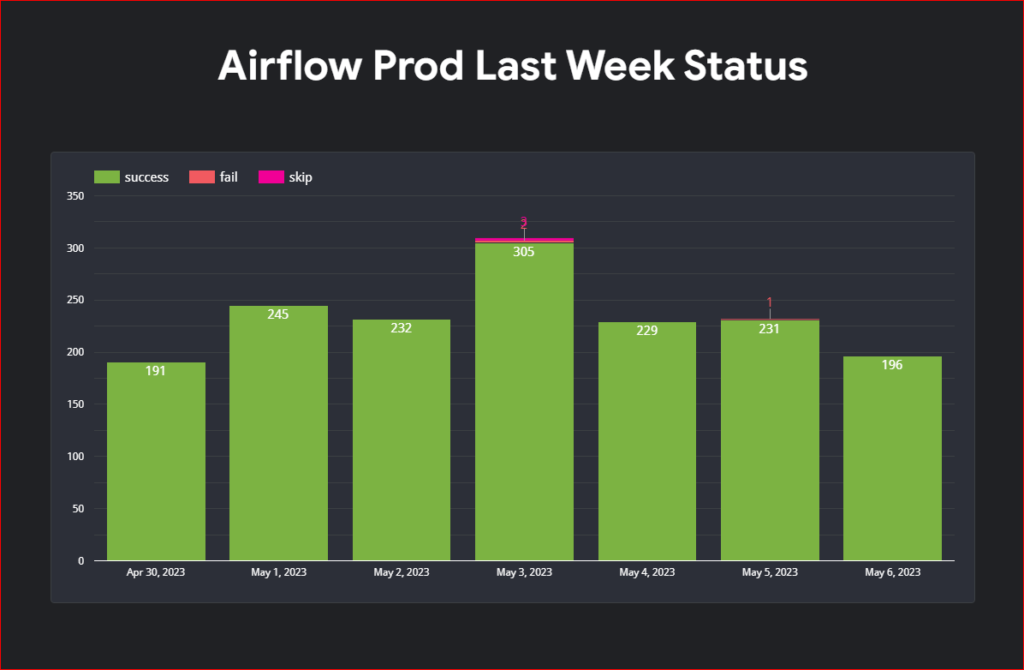
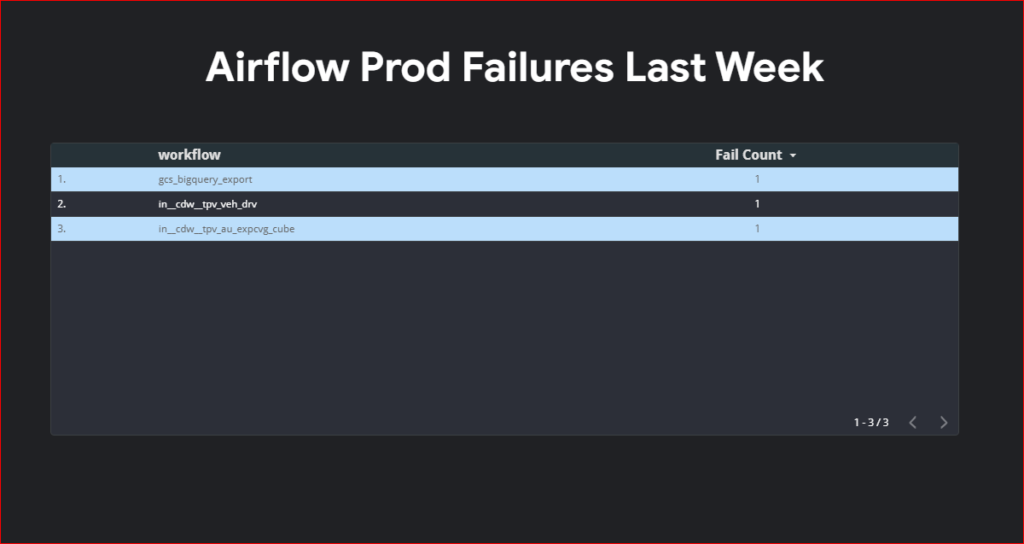
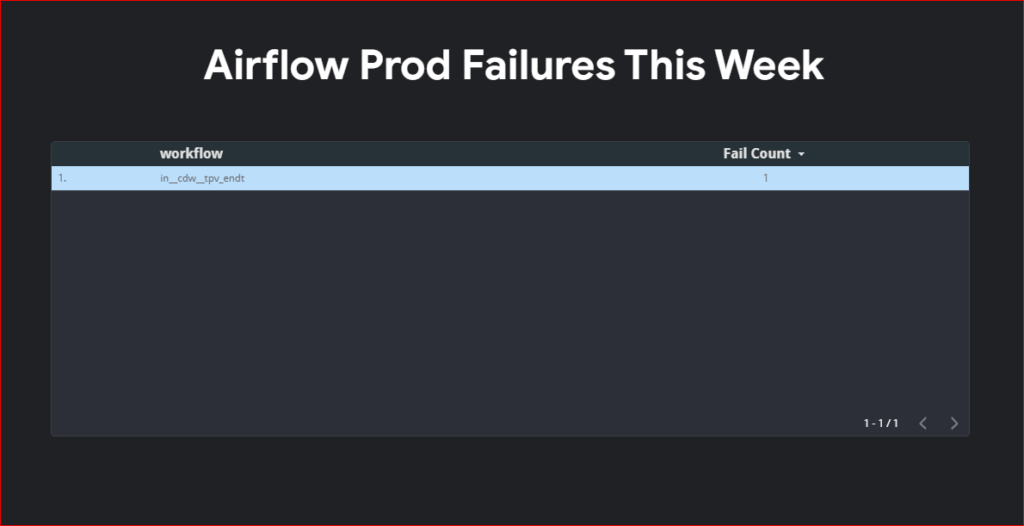
In our daily operations, we rely on Airflow (Cloud Composer) to run hundreds of dags. While we have integrated it with ServiceNow and SMTP for airflow notifications, we found that these measures were insufficient in providing us with valuable insights. We needed a way to track the number of failed dags over a specific period, identify which dags were failing more frequently, and gain a comprehensive understanding of our workflow performance.

To address these challenges, we decided to create a Looker Studio dashboard by leveraging the power of BigQuery and redirecting Airflow (Cloud Composer) logs through a log sink. By storing our logs in BigQuery, we gained access to a wealth of data that allowed us to generate informative charts and visualizations. In this blog post, I will guide you through the step-by-step process of setting up this invaluable solution.

Create a Log Sink

To begin the process, navigate to the log router and create a sink using the following query. When configuring the sink, select the desired target as a BigQuery dataset where you want all the logs to be redirected. Additionally, it is recommended to choose a partitioned table, as this will optimize query performance, facilitate the cleanup of older logs, and reduce costs. By partitioning the table, BigQuery will scan less data when querying specific time ranges, resulting in faster results and more efficient resource usage.

"Marking task as"
resource.type="cloud_composer_environment"
log_name: "airflow-worker"
labels.workflow!="airflow_monitoring"
log sink to redirect airflow logs to bigquery for looker studio dashboard

Upon successful creation of the log sink you would be able to see airflow_worker table created in the dataset you have specified during the log sink configuration.

Write a query to get insight

Following query retrives the data from airflow_worker table and

  • Adjusting timestamps to “America/Toronto” timezone: Airflow (Cloud Composer) logs are stored in UTC timestamps by default. However, our scheduler is set to the “America/Toronto” timezone. To ensure consistency, I’m converting the timestamps to the “America/Toronto” timezone. Keep in mind that you may need to modify this part based on your own timezone settings.
  • Retrieving status information: The status of each Airflow DAG is captured in the textPayload column. I’m using regular expressions to extract one of three possible statuses: “Success,” “Fail,” or “Skip.” This allows us to easily identify the execution outcome of each DAG run.
    Since status information is only available at task level, I am considering dag as failed if any task within the dag has failed. if you choose to show information at task level you might need to modify this query.
SELECT
  *
FROM (
  SELECT
    DATE(timestamp, "America/Toronto") AS execution_date, -- this is UTC date 
    datetime(timestamp, "America/Toronto") as execution_timestamp, 
    labels.workflow,
    DATE(CAST(labels.execution_date AS timestamp), "America/Toronto") AS schedule_date, -- UTC Date 
    datetime(cast(labels.execution_date AS timestamp), "America/Toronto") AS schedule_timestamp, --- UTC timestamp 
    labels.try_number,
    CASE
      WHEN CONTAINS_SUBSTR(textPayload, "Success") THEN "success"
      WHEN CONTAINS_SUBSTR(textPayload, "SKIPPED") THEN "skip"
    ELSE
    "fail"
  END
    AS status,
    ROW_NUMBER() OVER(PARTITION BY labels.workflow, CAST(labels.execution_date AS timestamp)
    ORDER BY
      CASE
        WHEN CONTAINS_SUBSTR(textPayload, "Success") THEN 1
        WHEN CONTAINS_SUBSTR(textPayload, "SKIPPED") THEN 2
      ELSE
      0
    END
      ) AS rnk
  FROM
    ss-org-logging-project.airflow_dags_status.airflow_worker )
WHERE
  rnk = 1  

Dashboard.

Unfortunately due to my organization policy I can’t share my looker studio dashboard outside my organization so you will have to create your own dashboard. I am uploading screenshot of my dashboard for your reference.

airflow daily status
showing airflow daily status.
airflow prod weekly status
Airflow Prod Weekly Filed DAG List
Airflow Prod DAG Failure List

Leave a Comment

Monkey patching to decorate your library function

We are using Airflow as our scheduler/orchestrator for all AWS data related jobs. We use SSHOperator to run our jobs. Our support team complained that sometimes job fails while making a connection, and re-running them just works fine. This was creating a lot of noise. And as there is no re-try mechanism in operator, we can’t configure it to auto-retry.

I realized that SSHOperator class calls a function from SSHHook class which actually makes the ssh connection to given details.

Problem

There are lots of Dags (classes) which refers to function. How to add retry mechanism without modifying each and every class

Solution

Monkey patching is first thing which came to my mind. However, when I applied the monkey patching it created a recursion, as I had to call function again for retry. It took a while to fix this issue. However, finally I was able to fix it by creating another reference of original function is same class I am patching.

plugins/hooks/ssh_hook_with_retry.py

# -*- coding: utf-8 -*-

# Author: Gaurang Shah
#
from airflow.contrib.hooks.ssh_hook import SSHHook
import time 

max_retry = 3
retry = 0


def get_conn_with_retry(self):
    try:
		# call the original function 
        return SSHHook.original_func(self)
    except Exception as e:
        global retry
        if retry < max_retry:
            retry += 1
            print("tried %s times, failed to connect retrying again" %retry)
			time.sleep(60)
			# call the patched function which inturn calls get_conn_with_retry function 
            self.get_conn()
        else:
            raise e

plugins/hooks/__init__.py

from airflow.contrib.hooks import ssh_hook

# add new reference to original function to avoid recursion 
ssh_hook.SSHHook.original_func = ssh_hook.SSHHook.get_conn
from hooks.ssh_hook_with_retry import get_conn_with_retry

# path get_conn function with our function 
ssh_hook.SSHHook.get_conn = get_conn_with_retry

# when someone calls SSHHook.get_conn then ssh_hook_with_retry.get_conn_with_retry will be called
# and to call orignal get_conn we will have to call  SSHHook.original_func 
Comments closed

Airflow SMS Notification for Failed Jobs

Airflow only provides email notification for job failure. However, this is not enough for production job as not everyone have access to email on their phone. Atleast, that’s true with our team. And so, I had to figure out a way to send SMS notification for job failure so swift action can be taken.

Airflow SMS Notification

Send Logs to AWS S3 Bucket

modify following setting in airflow.cfg file to send Job logs to s3 bucket.
In my case ec2 has access to s3 bucket through aws role so I don’t need to provide connection Id. In your case you might need create connection id and then need to provide.

remote_log_conn_id =
remote_base_log_folder = s3://<your bucket name>/airflow-logs/
encrypt_s3_logs = False

Create AWS Lambda to Parse Logs.

AWS lambda will parse airflow job logs and parse it to check if any task has failed or not and based on that it will send message to airflow topic. Parsing the log file is not complicated, we just need to check for following line in log file which indicates if log file any task failed or not.

Make sure the s3 bucket where are storing airflow job logs sending put events to aws lambda.

import json
import boto3
import re
import os 
from urllib.parse import unquote_plus

# Publish a simple message to the specified SNS topic
def send_sns_notification(message):
    topicArn = os.environ.get("TopicArn")
    sns = boto3.client('sns')
    response = sns.publish(
        TopicArn=topicArn,    
        Message=message, 
        MessageAttributes={
            'AWS.SNS.SMS.SenderID': {
              'DataType': 'String',
              'StringValue': 'Airflow'   
            },
            'AWS.SNS.SMS.SMSType': {
              'DataType': 'String',
              'StringValue': 'Transactional'   
            }
        }   
    )
    
    print(response)

def lambda_handler(event, context):
    s3 = boto3.client('s3')
    error_regex=re.compile('(\[\d{4}-\d{2}-\d{2} \d{2}:\d{2}:\d{2},\d{3}\]) ({.*\.py:\d+}) (INFO) - Marking task as FAILED.\s*dag_id=(.*), task_id=(.*), execution_date=(.*), start_date=(.*), end_date=(.*)')
    for record in event['Records']:
        bucket = record['s3']['bucket']['name']
        key = unquote_plus(record['s3']['object']['key'])
        filename="{}/{}".format(bucket, key)
        print("processing {} file".format(filename))
        # Publish a simple message to the specified SNS topic
        data = s3.get_object(Bucket=bucket, Key=key)
        logfile_content = data['Body'].read().decode('utf-8')
        errors = error_regex.findall(logfile_content)
        if(len(errors) > 0):
            dag_name = key.split("/")[-4]
            task_name = key.split("/")[-3]
            message="job {} with task {} failed".format(dag_name, task_name)
            print(message)
            send_sns_notification(message)
            print("notification sent")
        else:
            print("file {} does not have any error".format(filename))
Leave a Comment

Airflow: Custom Failure Email Notification Template

Airflow allows you to set custom email notification template in case if you think the default template is not enough. However, this is only for the failure notification and not for retry notification (atleast in 1.10 version, things might change in version 2).

The template is divided into two parts, one for email subject and another for email body.

Default Failure Notification

Default Airflow Failure Notification Email

Custom Failure Email Notification

Custom Airflow Failure Notification Email

Airflow Failure Notification Subject Template

Airflow Job Failed: {{ ti.dag_id }}

Airflow Failure Notification Content Template

<!DOCTYPE html>
<html>
<body>
 <div style=" position: relative;  min-height: 100vh;">
   <div style="padding-bottom: 2.5rem;">
      <b>Task ID:</b> {{ ti.task_id }} <br>
      <b>Task execution date:</b> {{ ti.execution_date }} <br>
      <b>Log:</b> <a href="{{ti.log_url}}">Link</a><br>
      <b>Try:</b> {{try_number}} out of {{max_tries + 1}}<br>
      <b>Exception:</b><p style="background-color: #eee; border: 1px solid #999;display: block;padding: 20px;">{{exception_html}}</p>
      <b>Host:</b> {{ti.hostname}}<br>
      <b>Log file:</b> {{ti.log_filepath}}<br>
      <b>Mark success:</b> <a href="{{ti.mark_success_url}}">Link</a><br>
   </div>
  </br></br></br></br></br></br></br></br></br></br></br></br></br></br></br></br>
   <p style="background-color: #eee; border: 1px solid #999;display: block;padding: 15px;"><small>Powerdby airflow created by gaurang</small></p>
 </div>
</body>
</html>

Changing Config

Finally you need to change the airflow.cfg file to use the new template we just created. Put the above two files so any location and update the email section of the config to add html_content_template and subject_template properties.

[email]
email_backend = airflow.utils.email.send_email_smtp
html_content_template=/root/airflow/email/templates/content_template.j2
subject_template=/root/airflow/email/templates/subject_template.j2
Leave a Comment