Skip to content

Tag: looker studio

Google Bigquery – Find Query Cost By User

The organization I am currently consulting has recently migrated to the Google Cloud Platform (GCP) to leverage its powerful services, including Google BigQuery for efficient big data analysis. However, we have observed a significant increase in Query Execution costs and deemed it necessary to investigate the users or teams responsible for these expenses. By identifying the high spenders, we can provide them with valuable insights on optimizing query execution to minimize costs. It’s important to note that these users are transitioning from an on-premises environment where a CAPEX model was implemented, and they may not be fully aware of the cost implications associated with every query on GCP’s BigQuery. We aim to educate them on optimizing their queries to achieve the desired output while minimizing expenses effectively .

In this blog post, we will explore effective strategies to identify which teams or users are driving up costs

Use BigQuery Labels for Cost Attribution

To track query costs accurately, one option is to employ BigQuery labels. Although this method requires users to set labels manually before executing queries, it provides granular cost attribution. However, relying solely on users’ compliance may not always yield optimal results.

Leverage BigQuery Job Information Schema

BigQuery maintains detailed information for each job execution, including user details, slot utilization, and data processed. By querying the job information schema, you can calculate the query analysis cost per user accurately.

Ensure that the following permissions are granted to run this query:

  • bigquery.resourceViewer
  • bigquery.metadataViewer
SELECT
  user_email,
  SUM(total_cost) total_cost_per_user
FROM (
  SELECT
    reservation_id,
    user_email,
    CASE
      WHEN reservation_id IS NULL THEN (SUM(total_bytes_processed)/1024/1024/1024/1024)*5 -- 5 USD by TB processed 
      WHEN reservation_id is not null and reservation_id <> "default-pipeline" then (SUM(jbo.total_slot_ms)/(1000*60*60))*0.069 -- 0.69 USD per slot hour for northamerica-northeast1
  END
    AS total_cost
  FROM
    region-northamerica-northeast1.INFORMATION_SCHEMA.JOBS_BY_ORGANIZATION jbo
  WHERE
    DATE(creation_time) >= "2023-05-01" --change the filter 
  GROUP BY
    reservation_id,
    user_email )
GROUP BY
  user_email
ORDER BY
  total_cost_per_user DESC

Understand the Limitations of Cost Calculation using Information Schema

If your organization is utilizing on-demand pricing in BigQuery, the cost calculated through the information schema will closely align with the cost report.

However, if you organization is using auto-scalling slots, cost calculation through the information schema may not provide accurate results. While the information schema captures slot utilization during query execution, it doesn’t account for slots used during scale-up, scale-down, or the cooldown period. As a result, there may be discrepancies between the cost reported in the information schema and the actual cost shown in the cost report. This difference becomes more prominent for queries with shorter execution times (within 1 minute).

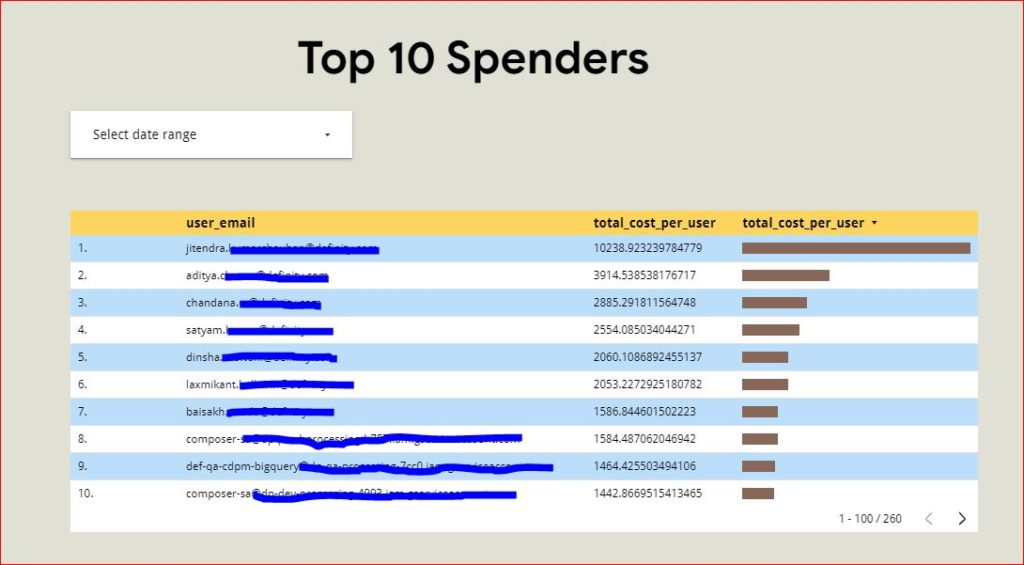
Looker Studio Reports for Quick Analysis and Visualization

To streamline the process of extracting query cost information, consider creating Looker Studio reports. These reports offer date filters, enabling quick access to the desired information. Additionally, Looker Studio reports provide a visual representation of query costs, facilitating a better understanding of cost trends and patterns.

Leave a Comment

Airflow Operational Dashboard using Bigquery and Looker Studio

In our daily operations, we rely on Airflow (Cloud Composer) to run hundreds of dags. While we have integrated it with ServiceNow and SMTP for airflow notifications, we found that these measures were insufficient in providing us with valuable insights. We needed a way to track the number of failed dags over a specific period, identify which dags were failing more frequently, and gain a comprehensive understanding of our workflow performance.

To address these challenges, we decided to create a Looker Studio dashboard by leveraging the power of BigQuery and redirecting Airflow (Cloud Composer) logs through a log sink. By storing our logs in BigQuery, we gained access to a wealth of data that allowed us to generate informative charts and visualizations. In this blog post, I will guide you through the step-by-step process of setting up this invaluable solution.

Create a Log Sink

To begin the process, navigate to the log router and create a sink using the following query. When configuring the sink, select the desired target as a BigQuery dataset where you want all the logs to be redirected. Additionally, it is recommended to choose a partitioned table, as this will optimize query performance, facilitate the cleanup of older logs, and reduce costs. By partitioning the table, BigQuery will scan less data when querying specific time ranges, resulting in faster results and more efficient resource usage.

"Marking task as"
resource.type="cloud_composer_environment"
log_name: "airflow-worker"
labels.workflow!="airflow_monitoring"
log sink to redirect airflow logs to bigquery for looker studio dashboard

Upon successful creation of the log sink you would be able to see airflow_worker table created in the dataset you have specified during the log sink configuration.

Write a query to get insight

Following query retrives the data from airflow_worker table and

  • Adjusting timestamps to “America/Toronto” timezone: Airflow (Cloud Composer) logs are stored in UTC timestamps by default. However, our scheduler is set to the “America/Toronto” timezone. To ensure consistency, I’m converting the timestamps to the “America/Toronto” timezone. Keep in mind that you may need to modify this part based on your own timezone settings.
  • Retrieving status information: The status of each Airflow DAG is captured in the textPayload column. I’m using regular expressions to extract one of three possible statuses: “Success,” “Fail,” or “Skip.” This allows us to easily identify the execution outcome of each DAG run.
    Since status information is only available at task level, I am considering dag as failed if any task within the dag has failed. if you choose to show information at task level you might need to modify this query.
SELECT
  *
FROM (
  SELECT
    DATE(timestamp, "America/Toronto") AS execution_date, -- this is UTC date 
    datetime(timestamp, "America/Toronto") as execution_timestamp, 
    labels.workflow,
    DATE(CAST(labels.execution_date AS timestamp), "America/Toronto") AS schedule_date, -- UTC Date 
    datetime(cast(labels.execution_date AS timestamp), "America/Toronto") AS schedule_timestamp, --- UTC timestamp 
    labels.try_number,
    CASE
      WHEN CONTAINS_SUBSTR(textPayload, "Success") THEN "success"
      WHEN CONTAINS_SUBSTR(textPayload, "SKIPPED") THEN "skip"
    ELSE
    "fail"
  END
    AS status,
    ROW_NUMBER() OVER(PARTITION BY labels.workflow, CAST(labels.execution_date AS timestamp)
    ORDER BY
      CASE
        WHEN CONTAINS_SUBSTR(textPayload, "Success") THEN 1
        WHEN CONTAINS_SUBSTR(textPayload, "SKIPPED") THEN 2
      ELSE
      0
    END
      ) AS rnk
  FROM
    ss-org-logging-project.airflow_dags_status.airflow_worker )
WHERE
  rnk = 1  

Dashboard.

Unfortunately due to my organization policy I can’t share my looker studio dashboard outside my organization so you will have to create your own dashboard. I am uploading screenshot of my dashboard for your reference.

airflow daily status
showing airflow daily status.
airflow prod weekly status
Airflow Prod Weekly Filed DAG List
Airflow Prod DAG Failure List

Leave a Comment